I have one new trick to tell you today...
Imagine you have a Sharepoint list with a Date field that is only showing a date value and not the Time. If you create a Custom Display Form in Sharepoint Designer, you will see something incredible.
- Date field shows Time value
- Date field shows less 1 hour, which might lead to show one less day in date value
Just like this:
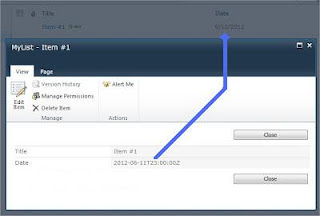 Check how I got the Date format...
1. Open your custom form in Sharepoint Designer and select the date value.
Check how I got the Date format...
1. Open your custom form in Sharepoint Designer and select the date value.
 2. Click the Formule button and write the following Formule:
ddwrt:FormatDate(string(@Date), 1033, 1)
Don't forget to use the string function!! Otherwise it will give you an error in XPath
1033 is the locale code, check other locale codes here List of Locale Codes
1 is the date format, the possible values are 1, 4, 5, 7,12, 13 or 15, each represent a different date format, pick the one that suites you better.
At least save your form and you will see a splendid result.
Enjoy my little trick...
2. Click the Formule button and write the following Formule:
ddwrt:FormatDate(string(@Date), 1033, 1)
Don't forget to use the string function!! Otherwise it will give you an error in XPath
1033 is the locale code, check other locale codes here List of Locale Codes
1 is the date format, the possible values are 1, 4, 5, 7,12, 13 or 15, each represent a different date format, pick the one that suites you better.
At least save your form and you will see a splendid result.
Enjoy my little trick...
dinsdag 27 november 2012
How to give a Date field the correct format in a custom DispForm


LCID Dec values for the XSLT FormatDate function
Use the LCID Dec values for the FormatDate function.
ddwrt:FormatDate(string(@Date), 1033, 1)
Language - Country/Region LCID Hex LCID Dec Afrikaans - South Africa 0436 1078 Albanian - Albania 041c 1052 Alsatian 0484 1156 Amharic - Ethiopia 045e 1118 Arabic - Saudi Arabia 0401 1025 Arabic - Algeria 1401 5121 Arabic - Bahrain 3c01 15361 Arabic - Egypt 0c01 3073 Arabic - Iraq 0801 2049 Arabic - Jordan 2c01 11265 Arabic - Kuwait 3401 13313 Arabic - Lebanon 3001 12289 Arabic - Libya 1001 4097 Arabic - Morocco 1801 6145 Arabic - Oman 2001 8193 Arabic - Qatar 4001 16385 Arabic - Syria 2801 10241 Arabic - Tunisia 1c01 7169 Arabic - U.A.E. 3801 14337 Arabic - Yemen 2401 9217 Armenian - Armenia 042b 1067 Assamese 044d 1101 Azeri (Cyrillic) 082c 2092 Azeri (Latin) 042c 1068 Bashkir 046d 1133 Basque 042d 1069 Belarusian 0423 1059 Bengali (India) 0445 1093 Bengali (Bangladesh) 0845 2117 Bosnian (Bosnia/Herzegovina) 141A 5146 Breton 047e 1150 Bulgarian 0402 1026 Burmese 0455 1109 Catalan 0403 1027 Cherokee - United States 045c 1116 Chinese - People's Republic of China 0804 2052 Chinese - Singapore 1004 4100 Chinese - Taiwan 0404 1028 Chinese - Hong Kong SAR 0c04 3076 Chinese - Macao SAR 1404 5124 Corsican 0483 1155 Croatian 041a 1050 Croatian (Bosnia/Herzegovina) 101a 4122 Czech 0405 1029 Danish 0406 1030 Dari 048c 1164 Divehi 0465 1125 Dutch - Netherlands 0413 1043 Dutch - Belgium 0813 2067 Edo 0466 1126 English - United States 0409 1033 English - United Kingdom 0809 2057 English - Australia 0c09 3081 English - Belize 2809 10249 English - Canada 1009 4105 English - Caribbean 2409 9225 English - Hong Kong SAR 3c09 15369 English - India 4009 16393 English - Indonesia 3809 14345 English - Ireland 1809 6153 English - Jamaica 2009 8201 English - Malaysia 4409 17417 English - New Zealand 1409 5129 English - Philippines 3409 13321 English - Singapore 4809 18441 English - South Africa 1c09 7177 English - Trinidad 2c09 11273 English - Zimbabwe 3009 12297 Estonian 0425 1061 Faroese 0438 1080 Farsi 0429 1065 Filipino 0464 1124 Finnish 040b 1035 French - France 040c 1036 French - Belgium 080c 2060 French - Cameroon 2c0c 11276 French - Canada 0c0c 3084 French - Democratic Rep. of Congo 240c 9228 French - Cote d'Ivoire 300c 12300 French - Haiti 3c0c 15372 French - Luxembourg 140c 5132 French - Mali 340c 13324 French - Monaco 180c 6156 French - Morocco 380c 14348 French - North Africa e40c 58380 French - Reunion 200c 8204 French - Senegal 280c 10252 French - Switzerland 100c 4108 French - West Indies 1c0c 7180 Frisian - Netherlands 0462 1122 Fulfulde - Nigeria 0467 1127 FYRO Macedonian 042f 1071 Galician 0456 1110 Georgian 0437 1079 German - Germany 0407 1031 German - Austria 0c07 3079 German - Liechtenstein 1407 5127 German - Luxembourg 1007 4103 German - Switzerland 0807 2055 Greek 0408 1032 Greenlandic 046f 1135 Guarani - Paraguay 0474 1140 Gujarati 0447 1095 Hausa - Nigeria 0468 1128 Hawaiian - United States 0475 1141 Hebrew 040d 1037 Hindi 0439 1081 Hungarian 040e 1038 Ibibio - Nigeria 0469 1129 Icelandic 040f 1039 Igbo - Nigeria 0470 1136 Indonesian 0421 1057 Inuktitut 045d 1117 Irish 083c 2108 Italian - Italy 0410 1040 Italian - Switzerland 0810 2064 Japanese 0411 1041 K'iche 0486 1158 Kannada 044b 1099 Kanuri - Nigeria 0471 1137 Kashmiri 0860 2144 Kashmiri (Arabic) 0460 1120 Kazakh 043f 1087 Khmer 0453 1107 Kinyarwanda 0487 1159 Konkani 0457 1111 Korean 0412 1042 Kyrgyz (Cyrillic) 0440 1088 Lao 0454 1108 Latin 0476 1142 Latvian 0426 1062 Lithuanian 0427 1063 Luxembourgish 046e 1134 Malay - Malaysia 043e 1086 Malay - Brunei Darussalam 083e 2110 Malayalam 044c 1100 Maltese 043a 1082 Manipuri 0458 1112 Maori - New Zealand 0481 1153 Mapudungun 0471 1146 Marathi 044e 1102 Mohawk 047c 1148 Mongolian (Cyrillic) 0450 1104 Mongolian (Mongolian) 0850 2128 Nepali 0461 1121 Nepali - India 0861 2145 Norwegian (Bokmål) 0414 1044 Norwegian (Nynorsk) 0814 2068 Occitan 0482 1154 Oriya 0448 1096 Oromo 0472 1138 Papiamentu 0479 1145 Pashto 0463 1123 Polish 0415 1045 Portuguese - Brazil 0416 1046 Portuguese - Portugal 0816 2070 Punjabi 0446 1094 Punjabi (Pakistan) 0846 2118 Quecha - Bolivia 046B 1131 Quecha - Ecuador 086B 2155 Quecha - Peru 0C6B 3179 Rhaeto-Romanic 0417 1047 Romanian 0418 1048 Romanian - Moldava 0818 2072 Russian 0419 1049 Russian - Moldava 0819 2073 Sami (Lappish) 043b 1083 Sanskrit 044f 1103 Scottish Gaelic 043c 1084 Sepedi 046c 1132 Serbian (Cyrillic) 0c1a 3098 Serbian (Latin) 081a 2074 Sindhi - India 0459 1113 Sindhi - Pakistan 0859 2137 Sinhalese - Sri Lanka 045b 1115 Slovak 041b 1051 Slovenian 0424 1060 Somali 0477 1143 Sorbian 042e 1070 Spanish - Spain (Modern Sort) 0c0a 3082 Spanish - Spain (Traditional Sort) 040a 1034 Spanish - Argentina 2c0a 11274 Spanish - Bolivia 400a 16394 Spanish - Chile 340a 13322 Spanish - Colombia 240a 9226 Spanish - Costa Rica 140a 5130 Spanish - Dominican Republic 1c0a 7178 Spanish - Ecuador 300a 12298 Spanish - El Salvador 440a 17418 Spanish - Guatemala 100a 4106 Spanish - Honduras 480a 18442 Spanish - Latin America 580a 22538 Spanish - Mexico 080a 2058 Spanish - Nicaragua 4c0a 19466 Spanish - Panama 180a 6154 Spanish - Paraguay 3c0a 15370 Spanish - Peru 280a 10250 Spanish - Puerto Rico 500a 20490 Spanish - United States 540a 21514 Spanish - Uruguay 380a 14346 Spanish - Venezuela 200a 8202 Sutu 0430 1072 Swahili 0441 1089 Swedish 041d 1053 Swedish - Finland 081d 2077 Syriac 045a 1114 Tajik 0428 1064 Tamazight (Arabic) 045f 1119 Tamazight (Latin) 085f 2143 Tamil 0449 1097 Tatar 0444 1092 Telugu 044a 1098 Thai 041e 1054 Tibetan - Bhutan 0851 2129 Tibetan - People's Republic of China 0451 1105 Tigrigna - Eritrea 0873 2163 Tigrigna - Ethiopia 0473 1139 Tsonga 0431 1073 Tswana 0432 1074 Turkish 041f 1055 Turkmen 0442 1090 Uighur - China 0480 1152 Ukrainian 0422 1058 Urdu 0420 1056 Urdu - India 0820 2080 Uzbek (Cyrillic) 0843 2115 Uzbek (Latin) 0443 1091 Venda 0433 1075 Vietnamese 042a 1066 Welsh 0452 1106 Wolof 0488 1160 Xhosa 0434 1076 Yakut 0485 1157 Yi 0478 1144 Yiddish 043d 1085 Yoruba 046a 1130 Zulu 0435 1077 HID (Human Interface Device) 04ff 1279
List copied from http://msdn.microsoft.com/en-us/goglobal/bb964664
dinsdag 6 november 2012
Horizontal alignment of Choise Fields
This week I found a way to change the alignment of a Choice Field.
Nice to know if you have list of questions where somebody has to choose
between for example three answers.

You only have to make a custom New/Edit page in Sharepoint Designer
and add the next line
<xsl:comment>FieldName="Display Name"</xsl:comment>
just before the sharepoint Formfield definition <SharePoint:FormField …

Change the "Display Name" by the display name of your Sharepoint Field.

Add a Content Editor webpart to your page and
put the next Jquery script in this webpart.
<script>
$( document ).ready( function() {
// columnName = Field Display Name
// perRow = how many choices you want to see in one row.
            $().SPServices.SPArrangeChoices({
                        columnName : "Display Name",
                        perRow: 3
                        });
});
</script>
donderdag 11 oktober 2012
Check if Sharepoint Richt Text Editor Field is empty or not (works in IE, Firefox and Chrome)
Found out this week that the code for checking the content of a multi-line rich text field was
not working for other than IE-browsers.
So after some debugging in Chrome I found a solution that works in Chrome and in Firefox.
I hope that it's also working in other browsers... but I don't have them to my position at work.
Have fun with my new code...
 firefox/chrome bugfix...
    var scomments = "";
    if ($.browser.msie)
 {
  // IE browser, check on language needed because Sharepoint and IE Translates the IFrame name in different languages.
  if (_spPageContextInfo.currentLanguage == 1036)
  {
            var systemDescriptionRTE = $("textarea[title='Comments']").closest("span").find("iframe[Title='Éditeur de texte enrichi']").contents().find("body");
            scomments = $(systemDescriptionRTE).text();
        }
        else
        {
            if (_spPageContextInfo.currentLanguage == 1043)
   {
                var systemDescriptionRTE = $("textarea[title='Comments']").closest("span").find("iframe[Title='RTF-editor']").contents().find("body");
                scomments = $(systemDescriptionRTE).text();
            }
            else
            {
                var systemDescriptionRTE = $("textarea[title='Comments']").closest("span").find("iframe[Title='Rich Text Editor']").contents().find("body");
                scomments = $(systemDescriptionRTE).text();
            }
        }
 }
 else
 {
 // if other browser
        var systemDescriptionRTETextArea = $("textarea[Title='Comments']");
        scomments = $(systemDescriptionRTETextArea).val();
 }
Now you can check with the 'scomments' variable is it is empty or containing some values.
donderdag 13 september 2012
Hide a webpart or Columns of a ListView webpart.
Found some interesting JQuery for hiding a SharePoint Webpart,
or some columns of a ListviewWebpart.
This can be usefull if you have some columns that are language depentend.
So of that moment you can hide for example a column with dutch text
or an other column with other information.
Or if you want that someone has less columns than another user
in the same view and you don't want to duplicate the views.

My example below will hide a complete webpart and the first three columns
of a ListView webpart.
Attention, if you have more than one listView webpart on your page,
all the same columns will be hidden.

If you know how I can determ to hide the columns of a specific webpart...
I'm interested in the code.
$( document ).ready( function() {
 // hide new webpart
 $(MSOZoneCell_WebPartWPQ5).hide();
 // hide column 1, 2 and 3
    $(".ms-listviewtable,.ms-emptyView").find("td:nth-child(1),th:nth-child(1)").hide();
    $(".ms-listviewtable,.ms-emptyView").find("td:nth-child(2),th:nth-child(2)").hide();
 $(".ms-listviewtable,.ms-emptyView").find("td:nth-child(3),th:nth-child(3)").hide();
});
dinsdag 4 september 2012
Change ContentType and Metadata of your Documents uploaded in a Sharepoint Library
This part for updating a sharepoint contentType for a uploaded Document in a SharePoint Library.
So Once you have uploaded a File into a SharePoint Library, you needs it's ID for changing the
metadata or contentType of a Document.
So first of all call my function below for getting the ID.
//Call to the function to get the ID
string sID = sGetID(sSiteUrl, sSiteList, sFileName);
private string sGetID(string sURL, string sListName, string sFileName)
{
string sID = "";
SPListsService.Lists list = new SPListsService.Lists();
list.Url = sSiteUrl + "/_vti_bin/lists.asmx";
// I have a common Boolean field for determing if I use the current logged on user or to use a Technical User.
// attention !!!! The user must have access to your Sharepoint environment.
if (bDefaultLogon)
list.Credentials = System.Net.CredentialCache.DefaultCredentials;
else
{
list.PreAuthenticate = true;
list.Credentials = new System.Net.NetworkCredential(sTechnicalUser, sTechnicalPw, sTechnicalDomain);
}
try
{
string rowLimit = "99999";
XmlDocument xmlDoc = new System.Xml.XmlDocument();
XmlNode listQuery = xmlDoc.CreateNode(XmlNodeType.Element, "Query", "");
listQuery.InnerXml = "" + sFileName + "
My Code below will change the ContentType of your Document and also some extra Metadata.
Now it is posible that you would not want to change the ContentType,
 so if not, put the call in comment.
The reason why you need the change of your ContentType and
the rest of your Metadata in a different XML update block
is because by changing the ContentType, other Columns/MetaData becomes at your position,
as examle your colums that you have created in your ContentType
are not at your position before you have changed your ContentType.
Only the default Columns are available.
// Call to the function for update file metadate
bool ret = UpdateFileDataViaBatch(sID, sSiteUrl, sSiteList, Array_FileMetaData);
/* -- Update File columns in Sharepoint List-- */
private Boolean UpdateFileDataViaBatch(string sId, string sSiteUrl, string sSiteList, DataTable ExtraFileMetaData)
{
Boolean retcode = true;
XmlDocument xmlDoc = new XmlDocument();
XmlElement elBatch = xmlDoc.CreateElement("Batch");
elBatch.SetAttribute("OnError", "Continue");
elBatch.SetAttribute("ViewName", GetViewId(sSiteUrl, sSiteList, ""));
try
{
string strBatch = "";
int id = 0;
if (ExtraFileMetaData.Rows.Count > 0)
{
DataRow drFileInfo = ExtraFileMetaData.Rows[0];
// call for creating your xml-element for changing the contentType... If you don't need to change it, put it in comment
strBatch = changeContentType(id,drFileInfo, sId);
// call for creating you xml-element for updating your document with extra info.
strBatch = strBatch + createXmlUpdateBatch(++id, drFileInfo, sId);
}
elBatch.InnerXml = strBatch;
Boolean retcodeUpdSPList = UpdateSPList(sSiteUrl, sSiteList, elBatch);
}
catch { }
return retcode;
}
private string changeContentType(int id, DataRow drFileInfo, string sID)
{
String strBatch = "";
strBatch = strBatch + "";
strBatch = strBatch + "" + sID + " ";
strBatch = strBatch + "" + replaceSpecialChars(drFileInfo["ContentType"].ToString()) + " ";
strBatch = strBatch + " ";
return strBatch;
}
private string createXmlUpdateBatch(int id, DataRow drFileInfo, string sID)
{
String strBatch = "";
strBatch = strBatch + "";
strBatch = strBatch + "" + sID + " ";
strBatch = strBatch + "" + replaceSpecialChars(drFileInfo["ExtraFileMetaData1"].ToString()) + " ";
strBatch = strBatch + "" + replaceSpecialChars(drFileInfo["ExtraFileMetaData2"].ToString()) + " ";
strBatch = strBatch + " ";
return strBatch;
}
private string replaceSpecialChars(string mystring)
{
mystring = mystring.Replace("&", "&");
mystring = mystring.Replace("<", "<");
mystring = mystring.Replace(">", ">");
mystring = mystring.Replace("\"", """);
mystring = mystring.Replace("'", "'");
return mystring;
}
At least you also need the function for the real update...
otherwise you have your batch XML document,
but your data isn't updated yet.
So you also need my function below for executing your
Batch Element by using the Lists.asmx webservice.
 /* -- Update SharePoint List -- */
    private Boolean UpdateSPList(string sSiteUrl, string sSiteList, XmlElement elBatch)
    {
        Boolean retcode = true;
        SPListsService.Lists list = new SPListsService.Lists();
        list.Url = sSiteUrl + "/_vti_bin/lists.asmx";
        if (bDefaultLogon)
            list.Credentials = System.Net.CredentialCache.DefaultCredentials;
        else
        {
            list.PreAuthenticate = true;
            list.Credentials = new System.Net.NetworkCredential(sTechnicalUser, sTechnicalPw, sDomain);
        }
        try
        {
            XmlNode ndReturn = list.UpdateListItems(sSiteList, elBatch);
            // Instantiate a new XML document object to hold the return value(s)
            XmlDocument xmlResult = new XmlDocument();
            xmlResult.LoadXml(ndReturn.OuterXml);
            // SharePoint XML always uses a fixed namespace; you'll need your own NamespaceManager object to parse the return values
            XmlNamespaceManager nsMgr = new XmlNamespaceManager(xmlResult.NameTable);
            nsMgr.AddNamespace("sp", ndReturn.NamespaceURI);
            XmlNode ndRoot = xmlResult.SelectSingleNode("sp:Results", nsMgr);
            // Find the ErrorCode node, which exists for all operations regardless of status.
            XmlNodeList nlResults = ndRoot.SelectNodes("//sp:Result/sp:ErrorCode", nsMgr);
            // Loop through the node collection and find each ErrorCode entry
            foreach (XmlNode ndResult in nlResults)
            {
                // Check the value of the node to determine its status
                if (ndResult.InnerText != "0x00000000")
                {
                    XmlNode ndError = ndResult.NextSibling;
                    string sError = ndError.InnerText;
                    // Set the value of string variable to hold the error code
                    // If you want to trip the Try…Catch, throw and exception of whatever type suits you
                }
                else
                {
                    // put your code on success... whatever you want
                }
            }
        }
        catch (Exception e)
        {
            retcode = false;
        }
        finally
        {
            list.Dispose();
        }
        return retcode;
    }
If you have questions, don't hesitate to contact me...
I only use the webservices to be undependent of the environment
to run the code on... So it hasn't to be on a sharepoint Environment !
If there are problems with my code, please let me know...
Upload File from a networkdrive into a Sharepoint Library
Last week I wrote some code for migrating a networkdrive folder content into a SharePoint Library.
You cannot use the Lists.asmx for uploading the documents because this webservice does not provide
the functionality for uploading files.
But after a little bit of research I found quickly that you can use the copy.asmx webservice.
Normally it is used for copying files between two SharePoint Libraries but it also
work for copying files from a networkdrive into a SharePoint Library.

So you can use the code behind for copying a file on a network drive in a Sharepoint Library.
        SPCopyService.Copy copy = new SPCopyService.Copy();
  copy.Url = sSiteUrl + "/_vti_bin/copy.asmx";
        try
        {
            if (bDefaultLogon)
                copy.Credentials = System.Net.CredentialCache.DefaultCredentials;
            else
            {
                copy.PreAuthenticate = true;
                copy.Credentials = new System.Net.NetworkCredential(sTechnicalUserID, sTechnicalUserPW, sTechnicalUserDomain);
            }

            string destinationUrl = sSharePointDestinationFolder + "/" + sfilename;
            // destinationUrl = SiteUrl + "/" + SiteLibrary + "/" + OptionalFolder + "/" + filename.Extention
            string[] destinationUrls = { destinationUrl };
            SPCopyService.FieldInformation info1 = new SPCopyService.FieldInformation();
            info1.DisplayName = sfilename;
            info1.InternalName = replaceSpecialChars(sfilename);
            info1.Type = SPCopyService.FieldType.Text;
            info1.Value = replaceSpecialChars(sfilename);
            SPCopyService.FieldInformation[] info = { info1 };
            SPCopyService.CopyResult copyResult = new SPCopyService.CopyResult();
            SPCopyService.CopyResult[] copyResults = { copyResult };
            //Reading the document contents in to stream
            FileStream strm = new FileStream(sFilePath + @"\" + sfilename, FileMode.Open, FileAccess.Read);
            byte[] fileContents = new Byte[strm.Length];
            byte[] r = new Byte[strm.Length];
            int ia = strm.Read(fileContents, 0, Convert.ToInt32(strm.Length));
            strm.Close();
            // call the webservice procedure CopyIntoItems
            uint result = copy.CopyIntoItems(sfilename, destinationUrls, info, fileContents, out copyResults);
            // Check for Errors:
            foreach (SPCopyService.CopyResult copyRes in copyResults)
            {
                string msg =  "====================================" +
                "\n " + "SharePoint Error:" +
                "\n " + "              Url: " + copyRes.DestinationUrl +
                "\n " + "              Error Code: " + copyRes.ErrorCode +
                "\n " + "              Message: " + copyRes.ErrorMessage +
                "\n " + "====================================";
                if (copyRes.ErrorCode.ToString().Equals("Success"))
                {
                    // code for success if needed...
                }
                else
                {
                    // code for a failure if needed...
                }
                Console.WriteLine(msg);
            }
        }
        catch (Exception e)
        {
            iFailedUpdatedRecords++;
            Console.WriteLine("   Error on upload...");
        }
        finally {
            copy.Dispose();
        }
donderdag 2 augustus 2012
Custom Webpart Page with Attachments
What a day, searching for several hours to found out how it come's
that the attachment functionality didn't work at a custom aspx webpart page.
After searching and searching I found the solution.
You may not use New/Edit/Display Form directly from your list, but use it via the Custom List Form.
Otherwise the Attachment functionality will not be provided and I hadn't found
a way to let it functioning.
So far even that I didn't got an error message anymore and that the attachment
wasn't saved into your item.

So how to do it... Follow these steps:

1.       Create a custom list.

2.       Open that site in SharePoint designer,
         and create a new web part page in Site Page,
         then open it in advanced mode.

3.       Then new web part page is opened.
         Click Insert > New Item Form > Custom List Form >
         Select that custom list to use for form >
         Select Item content type to use for form >
         Select New item form to create >
         Keeping Show standard toolbar is checked > Click OK.

Then I can get a SharePoint:FormToolBar with Attach File and Spelling options.
Then save and preview this page, you can see the toolbar in the ribbon is enabled.
Go back to the web part in SharePoint Designer,
and delete the SharePoint:FormToolBar control,
save the page and preview it, we can see,
the toolbar with Save, Cancel, Paste and Attach File buttons is disabled.
donderdag 5 juli 2012
Workflow with Impersonation Step and his Publisher
Important to know if you use an impersonation step in a workflow, and you change the rights of
the user that has published the workflow, the workflow will start failing to execute his code.
Last week we cleaned up some user accounts of employees that din't work any more in the company
and suddenly we remarked that certain workflows were not working any more.

The workflow impersonates the "Author" from a SharePoint point of view for that step.
So if she somehow looses her rights if'll fail.
The reason I'm putting "Author" in quotes is that in my option it's a wrong term,
because in fact it's the last publisher's identity which is used.
So if the workflow fails due to the "Author" loosing the rights any user with sufficient rights
can go in and publish the workflow and it'll start working again.

In fact you can do this as a general rule and have some "service account"
which is used to publish all workflows so they'll run with the permissions of that account
which should then not be a real person.
zondag 24 juni 2012
Value of approvalStatus changes in function of MUI Language
Believe it or not, but I was supprised that technical fields from Sharepoint are translated when
you change your MUI Language.

I discovered it by accident when a user called me, that my draft image was always visible
even when the document was approved.
So after some debugging I saw that the approvalStatus field of sharepoint was translated in the
language of the MUI.

In our configuration, we have English, Dutch and French. So the approvalStatus field is getting
in English the value "approved", in Dutch : "goedgekeurd" and in French : "approuvé" !

If you do equal stuff, I have coded next script in a Content Editor Webpart for my users :
 //show draft image if topic is not approved
            if (document.getElementById('approvalStatus').innerHTML.toLowerCase() == 'approved'
      || document.getElementById('approvalStatus').innerHTML.toLowerCase() == 'approuvé'
      || document.getElementById('approvalStatus').innerHTML.toLowerCase() == 'goedgekeurd')
            {
                document.body.background = '';
            }
            else
   {
    document.body.style.backgroundPosition="center";
    document.body.style.backgroundImage="url(../../SiteCollectionImages/watermark-draft.png)";
    document.body.style.backgroundRepeat="no-repeat";
            }
Get User Roles, Security groups on Client site
Last week I figgered out how to know in which security group the logged-on user has access to
in order to show or hide some fields or ribbon items.
For example to prevent to show All Site Contents in the action menu.

Below some code that does the work for you... have fun with it ;)
<script src="/scripts/jquery-1.7.min.js" type="text/javascript"></script>
<script src="/scripts/jquery.SPServices-0.7.0.js" type="text/javascript"></script>
<script type="text/javascript">

 getCurrentUserRole();
 function getCurrentUserRole() {
  $().SPServices({
   operation: "GetGroupCollectionFromUser",
   userLoginName: $().SPServices.SPGetCurrentUser(),
   async: false,
   completefunc: function (xData, Status) {

    if( Status == "success") {
     //alert(xData.responseText);
     $(xData.responseXML).find("Group").each(function () {
      if ($(this).attr("Name") == "DevSite Owners")
      {
       alert("write access");
      }
      else
      {
       // wrong access hide some stuff... for example the Site Action link.
       $("#siteactiontd").hide();
       // hide the global navigation folder
       $("#GlobalBreadCrumbNavPopout-anchor").hide();
      }//alert($(this).attr("Name"));
     });
    }
   }
  });
 }
</script>
Refinements, "Show More" link stopped working
I recently discovered that the “Show More” link on the Search Refinement Panel web part
had stopped working, seemingly out of the blue.
With a bit of debugging I discovered that the functions defined in the onclick event:
onclick="SearchEnsureSOD();ToggleRefMoreLessFilters(this, true);"
were returning “Object Expected”.
For some reason the functions were no longer defined.

I eventually figured out that the problem was that I had removed the Search Box web part
from the page and replaced it with my own custom search box.

Apparently the Search Box web part is required on the same page as the Refinement Panel web part,
as it injects JavaScript into the page that is used by the Refinement Panel.

I fixed the problem by adding the Search Box web part back onto the page and hiding it.
donderdag 14 juni 2012
SharePointblog.co.uk is doing a 100 days/100posts on Business Analysis
Yust saw next big news in Balestra's Blog :

The people over at SharePointblog.co.uk are going to post 100 blogposts in the next 100 days
about Business analysis to improve SharePoint requirements gathering.

Some will be quick tips, other big posts.

They also have a twitter hashtag: #bamasterclass .

Don't miss it!!
Check if Sharepoint Richt Text Editor Field is empty or not
Today I had some problems to do a check wether a Rich Text Editor field is filled in or not.
I found out that sharepoint also translates the Title of the Rich Text Editor field.
That was really unexpected because the iframe is dynamically constructed in the browser.
So you would expect that changing the MUI language would translate the
Title propertie of the RTE field.
So for Frensh, Dutch and English MUI languages you could do the check like below.
var scomments = "";
if (_spPageContextInfo.currentLanguage == 1036) {
    var systemDescriptionRTE = $("textarea[Title='Comments']").closest("span").find("iframe[Title='Éditeur de texte enrichi']").contents().find("body");
    scomments = $(systemDescriptionRTE).text();
}
else
{
 if (_spPageContextInfo.currentLanguage == 1043) {
        var systemDescriptionRTE = $("textarea[Title='Comments']").closest("span").find("iframe[Title='RTF-editor']").contents().find("body");
        scomments = $(systemDescriptionRTE).text();
    }
    else
    {
        var systemDescriptionRTE = $("textarea[Title='Comments']").closest("span").find("iframe[Title='Rich Text Editor']").contents().find("body");
        scomments = $(systemDescriptionRTE).text();
    }
}
Bugfix available at this new blogpost :
 http://andydevelopments.blogspot.com/2012/10/check-if-sharepoint-richt-text-editor.html
zondag 15 april 2012
Check if Rich TextField is Empty
Last week I had some problems to do a check wether a Rich Text Box is filled in or not.
When doing a check on the Text propertie of the TextField,
I found out that Sharepoint puts default something in the TextField.

Like it or not, but it's really frustrating that you can't use the JQuery test .isEmpty().
So after some testing, I found out that Sharepoint puts a Paragraph tag in the TextField.
So here under you can found out how I did the check wether a Rich TextField is filled in or not.
if( ($(ctl00_m_g_6e043a15_d2d5_4e91_a8c6_562e51fe3b46_ff121_ctl00_ctl00_TextField_inplacerte).text() == "") || ($(ctl00_m_g_6e043a15_d2d5_4e91_a8c6_562e51fe3b46_ff121_ctl00_ctl00_TextField_inplacerte).html() == "?
") ) { alert('Please fill in the Rich Text box field !'); return false; }
maandag 9 april 2012
Update or Insert Sharepoint ListItems in a List Library
Looking for a way to update a Sharepoint ListItem by using the Lists.asmx webservice...
For doing this you need to create your function to create your Xml Layout
and afterwards call the function below UpdateSPList.
 XmlDocument xmlDoc = new XmlDocument();
 XmlElement elBatch = xmlDoc.CreateElement("Batch");
 elBatch.SetAttribute("OnError", "Continue");
 // this because if one of the methods gives an error it will continue with the next method
 elBatch.SetAttribute("ViewName", Sharepoint_ViewId);
 elBatch.InnerXml = strBatch;

 returncode = UpdateSPList( sSiteUrl,  sSiteList,  elBatch);
strBatch containing for example:
<Method ID='0' Cmd='Update'>
    <Field Name='ID'> SharepointListItem.ows_ID </Field>
</Method>
<Method ID='1' Cmd='Update'>
    <Field Name='ID'>OtherSharepointListItem.ows_ID </Field>
</Method>
<Method ID='0' Cmd='New'>
            <Field Name='ID'>New</Field>
            <Field Name='Title'>YOUR TEXT HERE</Field>
</Method>
<Method ID='1' Cmd='New'>
            <Field Name='ID'>New</Field>
            <Field Name='Title'>YOUR TEXT HERE</Field>
Remark: The next Chars must be translated in the text values for your Fieldtag:
    "&" ==> "&"
    "<" ==> "<"
    ">" ==> ">"
    "\"" ==> """
    "'" ==> "'"

Below you find my Function that I have created that actualy does
the update or insert into your List.
It requires three parameters :
- the Site Url you are working on
- the List name on which you want to add or update one or more items
- the XML that contains the Batch Element

You will see that the function also uses the next global parameters
- sTechnicalUser
- sTechnicalPw
- sDomain
- bDefaultLogon (if true you will connect to the webservice with the
user that is executing the program, otherwise use the technical user with it's
password and domain.
This is done for giving the possibility to let shedule the program.
 private Boolean UpdateSPList(string sSiteUrl, string sSiteList, XmlElement elBatch)
        {
            Boolean retcode = true;

            REFERANCENAME.Lists list = new REFERANCENAME.Lists();
            list.Url = sSiteUrl + "/_vti_bin/lists.asmx";
            if (bDefaultLogon)
                list.Credentials = System.Net.CredentialCache.DefaultCredentials;
            else
            {
                list.PreAuthenticate = true;
                list.Credentials = new System.Net.NetworkCredential(sTechnicalUser, sTechnicalPw, sDomain);
            }
            logThis("Start updateSPList " + sSiteUrl + " " + sSiteList + " ...");
            try
            {
                XmlNode ndReturn = list.UpdateListItems(sSiteList, elBatch);
                logThis(sSpaces + "return " + ndReturn.OuterXml);
                // Instantiate a new XML document object to hold the return value(s)
                XmlDocument xmlResult = new XmlDocument();
                xmlResult.LoadXml(ndReturn.OuterXml);
                // SharePoint XML always uses a fixed namespace; you'll need your own NamespaceManager object to parse the return values
                XmlNamespaceManager nsMgr = new XmlNamespaceManager(xmlResult.NameTable);
                nsMgr.AddNamespace("sp", ndReturn.NamespaceURI);
                XmlNode ndRoot = xmlResult.SelectSingleNode("sp:Results", nsMgr);
                // Find the ErrorCode node, which exists for all operations regardless of status.
                XmlNodeList nlResults = ndRoot.SelectNodes("//sp:Result/sp:ErrorCode", nsMgr);
                // Loop through the node collection and find each ErrorCode entry
                foreach (XmlNode ndResult in nlResults)
                {
                    // Check the value of the node to determine its status
                    if (ndResult.InnerText != "0x00000000")
                    {
                        XmlNode ndError = ndResult.NextSibling;
                        string sError = ndError.InnerText;
                        // Set the value of string variable to hold the error code
                        this.logThis("Update operation failed for " + sSiteList + ": " + sError + ".");
                        // If you want to trip the Try…Catch, throw and exception of whatever type suits you
                        iFailedUpdatedRecords++;
                    }
                    else
                    {
                        iUpdatedRecords++;
                    }
                }
           }
            catch (Exception e)
            {
                logThis(sSpaces + "Error UpdateSPList ", e);
                retcode = false;
            }
            finally
            {
                list.Dispose(); // important!!!! always dispose your sharepoint objects !!!!!
                logThis("End updateSPList " + sSiteUrl + " " + sSiteList);
            }
            return retcode;
        }
donderdag 5 april 2012
Block Excape and Ctrl+z keypress to prevent the undo action by keyboard
One of the disadvantages of using Jscript of JQuery is when a user uses
the Escape or CTRL+z on his keyboard that
your actions, like filling in input fields, in your scripting are being undone.

So best option in this case is to prevent that thoose events are being executed.
This you can do by capturing the keypresses of the Escape key and the CTRL+z key combination.
The script below will execute on the document Keydown event.
 function DisableEscAndCtrlZ(){
  document.onkeydown = function(evt) {
   evt = evt || window.event;
   // ctrl+z
   if (evt.ctrlKey && evt.keyCode == 90) {
    return false;
   }
   // esc
   if (evt.keyCode == 27) {
    return false;
   }
  };
 }

 $(document).ready( function() {
  DisableEscAndCtrlZ();
 };
maandag 2 april 2012
View SharePoint Attachments in Display Pages
When creating a Custom Page of the Type Display, Sharepoint does not include
the attachments in your page.

To display attachments that dissapear in a custom display form,
simply add a new row in the custom display form
and add the following line within that row in the code view.
<SharePoint:AttachmentsField ControlMode="Display" FieldName="Attachments" runat="server" Visible="true"/>
Enyoi your attachments in your Display ASPX pages ;-)
zaterdag 31 maart 2012
Custom Cancel button, Go Back to the web-page you came from ...
Nice to have against the Close or Save button is a beautifull Cancel button.
A request of a customer this week was to have a link on there intranet
to a sharepoint custom new page, but without the Sharepoint header and menu.

So people could add items in a list, but nothing else more.

On the page the Sharepoint Close/Cancel button returns automatically back to
the Sharepoint List. But what the customer wanted was that the requester
returned back to the page where they came from or,
if the page was openend in a new window, to close the window.

To do this, replace the Sharepoint Close/Cancel button with our own custum buttom.
add a little script in a content Editor webpart to execute the return function (goback).
<input type="button" value="Cancel" name="CancelButton" class="ms-ButtonHeightWidth" onclick="goback();" />

// in content editor webpart:
function goback() {
    // Jumps back
            //history.back();
            if (history.length >0)
            {
                        history.back();
            }
            else
            {
                        window.close();
            }
}
vrijdag 30 maart 2012
Customizing the Search Results Page (XSLT) – Add highlighting
Thanks to Tobias Zimmergren I found out how to add Word Highlighting your Search Result Page.


Customizing the Search result page xslt by adding Highlighting

What you have to do is to adapt the XSL code in the XSLT Editor of the Core Search Result
webpart and locate the the following section (It already exist):
<xsl:template name="Hithightlighting">
And since this template exists from the beginning, all you really have to do is to customize
the style attribute and add a color property of the <b> tag
(I replaced it with a <strong> tag instead, for sake of standards)

Then you can simply specify the styles for each highlighted word like following:
 <xsl:template match="c0">
 <strong style="color:blue;"><xsl:value-of select="."/></strong>
 </xsl:template>
It’s simple as that. I hope this helped some of you to get started
on some basic Search Core Results XSLT customizations.


For customizing the result itself you can take also a look
at the blog of customize the search result using Sharepoint Designer.
dinsdag 27 maart 2012
Full screen width SharePoint Rich Text Editor
It can be frustrating in SharePoint when the "Rich Text Editor" on the edit page
of Wiki's, Blogs, Edit pages is set to fixed column width by default Sharepoint.

We get frequently the question to enlarge the width of the editor. This because
it's easier to fill in text in a fullscreen-width editor!

Here's the CSS to make it happen (warning, this syntax applies to ALL rich text editors!).

The first does all normal forms and wikis:
<style>
#onetIDListForm, #onetIDListForm .ms-formbody, #onetIDListForm iframe[title="Rich Text Editor"]{
 width:100% !important;
}
</style>
<style>
.ms-formbody span span div iframe, .ms-formbody span span table.ms-long{
 width:100%; text-align:left;
}

</style>
You just to need to put the code in a Content Editor Webpart on your page.

I hope that your customers enyoi the full width Rich Text Editors like ours...
zondag 11 maart 2012
How to open a custom page in Modal Sharepoint Popup Window.
Last week we wanted to open a custom made sharepoint page
in a Modal Sharepoint Popup window.
But this without enabling the option to open all windows in a modal popup.

This is easy to do.
Here is a JavaScript that will allow you to open any page in the modal popupwindow of Sharepoint.
//Handle the DialogCallback callback
function DialogCallback(dialogResult, returnValue){
    window.location = window.location;
}

//Open the Dialog
function OpenEditDialog(link){
    var options = {
        url:URL_TO_YOUR_PAGE + '&IsDlg=1',
        width: 700,
        height: 700,
        dialogReturnValueCallback: DialogCallback};
    SP.UI.ModalDialog.showModalDialog(options);
}
Notice that the IsDlg=1 query string parameter is appended
within the OpenEditDialog function.
The presence of “IsDlg” dynamically loads the "/_layouts/styles/dlgframe.css” file
which applies “display:none” to all items using the “s4-notdlg” css class.
This effectively hides items of this class in a dialog box.
For example, v4.master uses the “s4-notdlg” class for the Ribbon control
to hide the ribbon within dialogs.
dinsdag 6 maart 2012
Copy, Duplicate or Pre-populate Sharepoint Fields
New demand arrived to duplicate items in a custom list. Out of the box, Sharepoint hasn't provided
that functionality.
So, lets develop it our selfs...

Wat you need to do is to provide a custom link on you existing item that provides a parameter,
for example DID (Duplicate ID). Create a custom newform.aspx where you add a new datawebpart that
takes your parameter as filter. Add the fields that you want to duplicate to your page en put them
in a table that you set hidden.
Once done, you add a content webpart Editor to your page and some next script to your page :
_spBodyOnLoadFunctionNames.push('SPCC_Dup_fill_AllDefaultValues()');
ExecuteOrDelayUntilScriptLoaded(SPCC_Dup_fill_TaxonomyValues, "scriptforwebtaggingui.js");

// only change this function...
function SPCC_Dup_fill_AllDefaultValues(){
 // Pre-populate peoplepicker field
 // fillPeoplePicker (ID of Sharepoint Form PeoplePicker_userfield, Name of Sharepoint Form PeoplePicker_userfield, ID of DIV readonly field)
 SPCC_Dup_fill_PeoplePicker("FIELDID_UserField","FIELDNAME$UserField", "REFERENCE_DIV_ID");
 // Pre-populate text Field
 // fillInputField( ID of Sharepoint Form Text Field, ID of DIV readonly field)
 SPCC_Dup_fill_InputField("FIELDID_TextField","REFERENCE_DIV_ID");
 // Pre-populate Lookup/Select Field
 // Fill_Lookup_Select_FromFieldName(Form FieldName, ID of DIV readonly field, type [Lookup, DropDownChoice ] )
 SPCC_Dup_fill_Lookup_Select_FromFieldName("FIELDID_DropDownChoice","REFERENCE_DIV_ID", 'DropDownChoice');
 // Pre-Populate Hyperlink
 // FillHyperlinkField(Form FieldName Url, Form FieldName Description, ID of DIV readonly field);
    SPCC_Dup_fill_HyperlinkField("FIELDID_UrlFieldUrl","FIELDID_UrlFieldDescription", "REFERENCE_DIV_ID");
 // Pre-Populate CheckBox Yes No
 SPCC_Dup_fill_CheckboxFieldYN("FIELDID_BooleanField", "REFERENCE_DIV_ID");
 // Pre-Populate Date Time field.
 SPCC_Dup_fill_DateTimeField("FIELDID_DateTimeField_DateTimeFieldDate", "REFERENCE_DIV_ID", "mm/dd/yyyy");
 // Pre-Populate RadioButtonlist
 SPCC_Dup_fill_RadioButtonList("FIELDNAME$RadioButtons", "REFERENCE_DIV_ID");
 // Pre-Populate CheckButtonList
 SPCC_Dup_fill_CheckButtonList("FIELDID","REFERENCE_DIV_ID");
 // Pre-Populate Dropdown
 SPCC_Dup_fill_CustomSelect("FIELDID_DropDownChoice","REFERENCE_DIV_ID");
    // Pre-Populate MultiSelect
 SPCC_Dup_fill_MultiSelect("FIELDID_SelectCandidate", "REFERENCE_DIV_ID");
    // Pre-Populate MetaDataField
 // see SPCC_Dup_fill_TaxonomyValues function
 // Pre-populate Mutli line text Field
 SPCC_Dup_fill_MultiTextField("FIELDID_TextField_inplacerte","REFERENCE_DIV_ID");
}

function SPCC_Dup_fill_TaxonomyValues(){
 // Pre-Populate MetaDataField
 SPCC_Dup_fill_MetaDataFied("FIELDID_ctl02", "REFERENCE_DIV_ID");
}
I have written an function for the different types of Sharepoint Fields... if I have missed one,
don't hesitate to let me know...

Now the important block, the different functions...

two function I use often to get the Field Objects for manipulating the values or innerHTML methods:
// Direct call for getting the element Object by the ID-property of the element
function SPCC_Dup_getTagFromIdentifier(identifier) {  return document.getElementById(identifier); }
// Call for getting the element Object by the TagName and filter them by identifier or the ID-property
function SPCC_Dup_getTagFromIdentifierAndTitle(tagName, identifier, myid){
 var len = identifier.length;
 var tags = document.getElementsByTagName(tagName);
 for (var i=0; i< tags.length; i++)
 {
  var tempString = tags[i].id;
  if( (tags[i].id == myid) && ( (identifier == '') || (tempString.indexOf(identifier) == tempString.length - len)) )
  { return tags[i]; }
 }
 return null;
}
One of the difficult fields to fill in by script was the PeoplePicker.
This because when you take al look at the source of the generated Sharepoint HTML,
you see that the field exists of different span, div and input fields.
Also, in the view state of your element you get HTML tags with a link and
as display the name of the user that you have to put in the PeoplePicker field.
So first step is to get only the username.
Second step is to retrieve the element object of the peoplepicker field
that ends with _upLevelDiv.
Third step is to put your username in that DIV and at last but not least
to validate the user.
function SPCC_Dup_fill_PeoplePicker(myPeoplePicker_ID, myPeoplePicker_Name, newPP_ID){
// STEP 1: Retreive only username of the view PeoplePicker field
 var ppf = document.getElementById(newPP_ID);
 var myppfValue = ppf.innerHTML;
 var ibegin = myppfValue.indexOf('">') + 2;
 var myppfValueUpperCase = myppfValue.toUpperCase();
 var myPPValue = myppfValue.substr(ibegin, myppfValueUpperCase.indexOf('>/A<', ibegin ) - ibegin);
// STEP 2 : get the PeoplePicker field Object to fill in.
 var myPeoplePicker_UpperLevel_ID = myPeoplePicker_ID + '_upLevelDiv';
 var assingedToInput = SPCC_Dup_getTagFromIdentifier(myPeoplePicker_UpperLevel_ID);
// STEP 3 : put the username in the PeoplePicker Field object
 assingedToInput.innerHTML = myPPValue ;
// LAST STEP : refresh and validate picker control
 if(!ValidatePickerControl(myPeoplePicker_ID))
 {
    ShowValidationError();
 }
 var arg = getUplevel(myPeoplePicker_ID);
 var ctx = myPeoplePicker_ID;
 EntityEditorSetWaitCursor(ctx);
 WebForm_DoCallback(myPeoplePicker_Name,arg,EntityEditorHandleCheckNameResult,ctx,EntityEditorHandleCheckNameError,true);
}
One of the easy ones is the normal InputFields. With this field you only have to read and set the values...
function SPCC_Dup_fill_InputField(SPFF_ID, newTF_ID)
{
 var sptf = document.getElementById(newTF_ID);
 var spff = document.getElementById(SPFF_ID);
 spff.value = sptf.innerHTML;
}
An other hard one is the Multiline textfield. I have passed half a day for understanding how
this field is being generated by Sharepoint !!! Not easy to understand, because you only see a
hidden input field and some DIV's that are empty.

First step I have done is to remove from the view field the surrounded DIV-tag.
Afterwards convert it as full HTML format, and at least put it in the sharepoint Element and
call a sharepoint function to validate it. This is needed because otherwise your text is removed again.
function SPCC_Dup_fill_MultiTextField(SPFF_ID, newTF_ID){
// STEP 1 : get the content to fill in and remove the parent DIV-tag
            var sptf = document.getElementById(newTF_ID);
            var convertRTE = sptf.innerHTML;
            var ibegin = convertRTE.indexOf('">') + 5;
            convertRTE= convertRTE.substr(ibegin , convertRTE.indexOf('</div>',ibegin)-ibegin);
// STEP 2 : convert the content to full qualified HTML body format
            convertRTE= convertRTE.replace(/</g, "<");
            convertRTE= convertRTE.replace(/>/g, ">");
// STEP 3 : fill in the you multiline textfield with your bodycontent and validate it.
            var spff = document.getElementById(SPFF_ID);
            spff.UseInlineStyle = 'True';
            spff.innerHTML = convertRTE;
            RTE.RichTextEditor.transferContentsToInputField(SPFF_ID);
}
An other funny one is the Lookup or Select Fields.
This because Sharepoint can generate two different type of fields. Or it is an select/option list
or just even an input tag. This depending if there are less or more than 20 elements in the list.
So you need to check the type of field Sharepoint has created, and depending on it populate the
select-tag or input-tag.
function SPCC_Dup_fill_Lookup_Select_FromFieldName(fieldName, newTF_ID, type){
 var value = document.getElementById(newTF_ID).innerHTML;
 if (value == undefined) return;
 var theSelect = SPCC_Dup_getTagFromIdentifierAndTitle("select", type,fieldName);
// if theSelect is null, it means that the target list has more than
 // 20 items, and the Lookup is being rendered with an input element
 if (theSelect == null) {
  var theInput = SPCC_Dup_getTagFromIdentifierAndTitle("input","",fieldName);
  ShowDropdown(theInput.id); //this function is provided by SharePoint
  var opt=document.getElementById(theInput.opt);
  SPCC_Dup_setSelectedOption(opt, value);
  OptLoseFocus(opt); //this function is provided by SharePoint
 } else {
  SPCC_Dup_setSelectedOption(theSelect, value);
 }
}

function SPCC_Dup_setSelectedOption(select, value)
{
 var opts = select.options;
 var l = opts.length;
 if (select == null) return;
 for (var i=0; i < l; i++) {
  if (opts[i].value == value) {
   select.selectedIndex = i;
   return true;
  }
 }
 return false;
}
A Hyperlink field gives you in view an array with the link and the description of the link.
so to fill it in your newform you need to fill in two input fields.
function SPCC_Dup_fill_HyperlinkField(SPFFUrl_ID, SPFFDesc_ID, newTF_ID){
 var sptf = document.getElementById(newTF_ID);
 var spffurl = document.getElementById(SPFFUrl_ID);
 var spffdesc = document.getElementById(SPFFDesc_ID);
 var mySplitResult = sptf.innerHTML.split(", ");
 if(mySplitResult.length > 1)
 {
  spffurl.value = mySplitResult[0];
  spffdesc.value = mySplitResult[1];
 }
 else
 {
  spffurl.value = mySplitResult[0];
 }
}
Sharepoint provided also a YES_NO field, behind the screen it is just a checkbox.
function SPCC_Dup_fill_CheckboxFieldYN(SPFF_ID, newTF_ID){
 var sptf = document.getElementById(newTF_ID);
 var spff = document.getElementById(SPFF_ID);
 if (sptf.innerHTML.toUpperCase()=="TRUE"||sptf.innerHTML=="1"){
  spff.checked=true;
    }
    if (sptf.innerHTML.toUpperCase()=="FALSE"||sptf.innerHTML=="0"){
        spff.checked=false;
    }
}
Two elements that acts amost the same are the radiobutton list and the checkbutton list.
Here you need to loop the array of items in your fields and check them if needed.
function SPCC_Dup_fill_RadioButtonList(SPFF_Name, newTF_ID){
 var sptf = document.getElementById(newTF_ID);
 var spff = document.getElementsByName(SPFF_Name);
 if (spff != null)
 {
  for (i=0; i < spff.length;i++)
  {
   if (spff[i].parentNode.innerHTML.indexOf(sptf.innerHTML) >= 0)
    {spff[i].checked = true;}
   else
    {spff[i].checked = false;}
  }
 }
}

function SPCC_Dup_fill_CheckButtonList(SPFF_ID, newTF_ID){
 var sptf = document.getElementById(newTF_ID);
 var split_sptf = sptf.innerHTML.split(", ");
 var tags = document.getElementsByTagName('input');
 var identifier =  SPFF_ID.substr(0,SPFF_ID.length -5);
 var found = 0;
 for (var i=0; i< tags.length; i++)
 {   found = 0 ;
  var tempString = tags[i].id;
  if(tempString.indexOf(identifier) >= 0)
  {
   var spff= tags[i];
   for (j=0; j < split_sptf.length; j++)
   {
    if (spff.parentNode.innerHTML.indexOf(split_sptf[j]) >= 0)
    { spff.checked = true; found++;}
    else
       {   if (found == 0){spff.checked = false;}}
   }
  }
 }
}
The Date Time field of sharepoint is not so easy to fill in.
This because you get from your field a totaly other format as what you need to fill in sharepoint.
The new fields exists of three blocks of fields. The date-field, the Hour-field and the minutes-field.
So you need to convert your datetime result into three different blocks.
Also it is possible to fill in the hours as format HH: or HH AM/PM.
We have put our general site settings for time to 24h option.
So here an example function, but depending your site settings
it may have to be changed or be completed !
function SPCC_Dup_fill_DateTimeField(setDateFieldId,theDate, sDateFormat){
 // expecting format yyyy-MM-ddTHH:mm:ssZ
    var odate = SPCC_Dup_getTagFromIdentifier(theDate);
    var setDate = SPCC_Dup_getTagFromIdentifier(setDateFieldId);
    var setHours = SPCC_Dup_getTagFromIdentifier(setDateFieldId + "Hours");
    var setMinutes = SPCC_Dup_getTagFromIdentifier(setDateFieldId + "Minutes");
    if (odate != null)
    {
   var ddate = odate.innerHTML;
   if (ddate.length > 0)
   {
  var dDay = ddate.substring(8,10);
  var dMonth = ddate.substring(5,7);
  var dYear= ddate.substring(0,4);
  var dHours= ddate.substring(11,13);
  var dMinutes= ddate.substring(14,16);

  if (setDate != null)
  {
    if (sDateFormat.toLowerCase() == 'dd/mm/yyyy')
    {           setDate.value = dDay + '/' + dMonth + '/' + dYear;}
    if (sDateFormat.toLowerCase() == 'mm/dd/yyyy')
    {           setDate.value = dMonth + '/' + dDay + '/' + dYear;}
    if (sDateFormat.toLowerCase() == 'yyyy/mm/dd')
    {           setDate.value = dYear+ '/' + dMonth + '/' + dDay;}
  }
  if (setHours != null)
  {
    var iHours = parseInt(dHours) + 1;
    if ( iHours <10) {dHours = '0' + iHours;} else {dHours = iHours;}
    setHours.value = dHours +':';
  }
  if (setMinutes != null)
  {
    setMinutes.value = dMinutes;
  }
   }
 }
}
For a Select field, you have the option to choose of an normal selectbox,
or one where you may fill in a custom text. This means that in case of pre-populate
you need to check if you value exist in the Dropdown field, if not to fill in the
custom inputfield.
function SPCC_Dup_fill_CustomSelect(fieldID, newTF_ID){
 var value = document.getElementById(newTF_ID).innerHTML;
 if (value == undefined) return;
 var theSelect = document.getElementById(fieldID);
 if (SPCC_Dup_setSelectedOption(theSelect, value) == false)
 {   // value does not exist in the DropDown box. zo fill in the custum field.
  var myNewID = fieldID.replace("DropDownChoice", "ctl01");
  var theInput = document.getElementById(myNewID);
  theInput.value = value;
  var myNewButtonID = fieldID.replace("DropDownChoice", "FillInButton");
  SetChoiceOption(myNewButtonID);
 }
}
A interesting field for prepopulating is also the Multi Select field.
This because you get an array of fields in your result, but in the newform
you receive two multi select boxes. One with the available items and
one with the selected items.
For making me easy, I created the script to select first the items in the
candidates list and call the sharepoint function to populate them in the selected box.
So I don't have to remove them myself in the candidate list and transfer them manualy in
the selected items box.
function SPCC_Dup_fill_MultiSelect(fieldID, newTF_ID){
 var value = document.getElementById(newTF_ID).innerHTML;
 var fieldbuttonID = eval(fieldID.replace("SelectCandidate", "MultiLookupPicker_m"));
 var split_value = value.split("</a>");
 var theSelect = document.getElementById(fieldID);
 var i = 0;
 for (i=0; i< theSelect.options.length; i++)
 {
  var valuefound = false;
  for(var j=0;j< split_value.length;j++)
  {
   var ibegin = split_value[j].indexOf(">") + 4;
   var myMLPValue = split_value[j].substr(ibegin, split_value[j].length);
   if(theSelect.options[i].text == myMLPValue)
   {
    theSelect.options[i].selected = true;
    valuefound = true;
   }
   else
   {
    if(!valuefound)
    {
     theSelect.options[i].selected = false;
    }
   }
  }
 }
 GipAddSelectedItems(fieldbuttonID);
}
Last function I hope is the MetaData Field (or better known as Termstore or taxonomy-field).
What I thought to be difficult ended very easy to do.
You just need to fill in a DIV that has your fieldID followed by editableRegion.
put the values in that DIV and call a Sharepoint function
with as parameter the master Parent of your TermStore field.
And at least call the validation function to justify your filled in records.
function SPCC_Dup_fill_MetaDataFied(fieldID, referenceFieldID){
 var value = document.getElementById(referenceFieldID).innerHTML;
 if (value != '')
 {
  var resetDefault = document.getElementById(fieldID.substr(0,fieldID.length-1) + "1");
  resetDefault.value = "";
  var targetvalue = document.getElementById(fieldID);
  var mydiv = document.getElementById(fieldID);
  var editableRegion = document.getElementById(fieldID + "editableRegion");
  editableRegion.innerHTML = value;
  var taxonomyParent = editableRegion.parentNode.parentNode.parentNode;
  var taxonomyObject = new Microsoft.SharePoint.Taxonomy.ControlObject(taxonomyParent);
  taxonomyObject.validateAll();
 }
}
I hope I have handled all different types of fields.
It has costed me some hours of development, but I hope the functions I have written
may help you and others.
I also prefered not to use the JQuery library, this for learning reasons.
It makes you understand better how Sharepoints generates his fields
and how there behaviour are.


Spread the words around and forward my blog so many others can save some time on finding solutions.
dinsdag 21 februari 2012
Give Custom Save button with Sharepoint Layout and Redirection
People are adding custom controls to there sharepoint pages, but the buttons doesn't have
the same look and feel as the one Sharepoints generates itselfs.
But I wouldn't be a developer to give you a solution with gives you your buttons the same
look and feel as the Sharepoint buttons.

To get this, you must not add a HTML Button element, but a Input element of the type button.
For giving it the same look and feel of Sharepoint Buttons you have to
add a Sharepoint CSS class named "ms-ButtonHeightWidth"

In the example below you have a Button that you can use instead of the generated Save button
and that redirects your page after saving your content to an other location
than the standard view of your list in Sharepoint.
For the redirection you have to add some code that generates an event after a succesfull SaveAction.
<input type="button" value="Save" name="SaveButton" class="ms-ButtonHeightWidth" onclick="if (!PreSaveAction()) return false;{ddwrt:GenFireServerEvent('__commit;__redirect={<<SITE URL TO REDIRECT>>};')}" />
dinsdag 14 februari 2012
How to duplicate / Copy a Sharepoint List Item
One of the questions I have received last week was the next one :
"Is it possible to duplicate an existing Sharepoint List Item and change some fields before saving it"
Answer after some research... Yes it is... but there is no OOB solution available in Sharepoint.
Little bit supprised that the functionality doesn't exist in Sharepoint.
But not supprised completely because of the different tools I already worked with,
non of them had an answer OOB to that question!
Every time it had to be additional developed. But good news for the non-developers.
You can use javascript and some handy tricks to give an answer to that question.

So what do you have to do...
- First of all create a new Edit Form on your list.
- Secondly add on the bottom of your page add a Display Form,
  change the parameter "ID" of the datasource of your added Display Form to "DID".
  This will allow you to add in the Edit URL the parameter &DID=xxxxx
  whitch xxxxx containing the number of the record you want to duplicate

  Also what i did was putting only the to-copied fields in a table that's containg only
  the fields in DIV tags
  example:
  <table name='my_Copy_records' style='visibility:hidden'><tr><td>
  <DIV ID="RECORD1"><xsl:value-of select'@SHAREPOINT_TITLE_FIELD_REFERENCE' /></DIV>
  <DIV ID="RECORD2"><xsl:value-of select'@SHAREPOINT_PEOPLEPICKER_FIELD_REFERENCE' /></DIV>
  <DIV ID="RECORD3"><xsl:value-of select'@SHAREPOINT_DropDownChoice_FIELD_REFERENCE' /></DIV>
  <DIV ID="RECORD4"><xsl:value-of select'@SHAREPOINT_DATE_FIELD_REFERENCE' /></DIV>
  <DIV ID="RECORD5"><xsl:value-of select'@SHAREPOINT_URL_FIELD_REFERENCE' /></DIV>
  <DIV ID="RECORD6"><xsl:value-of select'@SHAREPOINT_BOOLEAN_FIELD_REFERENCE' /></DIV>
  </td></tr></table>
- And as last part you need to add an Content Editor Web Part as last part and add next Javascript in it...
Only one function has to be changed to let the copy function...
You need to change the fillAllDefaultValues function and put there the call's
you need to have to do for your form.
Also you need one time to look in your source code of your page in a browser
to search for all the needed id's that
Sharepoint has generated for you.
In the script you will need to change the [SP_ID] text to your ID's that you have found
in the source code.
 <![CDATA[<script type="text/javascript">

    _spBodyOnLoadFunctionNames.push('fillAllDefaultValues()');
 function getTagFromIdentifier(identifier) {   return document.getElementById(identifier);          }

 function getTagFromIdentifierAndTitle(tagName, identifier, myid)
    {
  var len = identifier.length;
        var tags = document.getElementsByTagName(tagName);
        for (var i=0; i< tags.length; i++)
        {
            var tempString = tags[i].id;
            if( (tags[i].id == myid) && ( (identifier == '') || (tempString.indexOf(identifier) == tempString.length - len)) )
            { return tags[i]; }
        }
        return null;
    }

    function fillPeoplePicker(myPeoplePicker_ID, myPeoplePicker_Name, newPP_ID)
    {
        var ppf = document.getElementById(newPP_ID);
        var myppfValue = ppf.innerHTML;
        var ibegin = myppfValue.indexOf('">') + 2;
        var myppfValueUpperCase = myppfValue.toUpperCase();
        var myPPValue = myppfValue.substr(ibegin, myppfValueUpperCase.indexOf('</A>', ibegin ) - ibegin);
        var myPeoplePicker_UpperLevel_ID = myPeoplePicker_ID + '_upLevelDiv';
        //var assingedToInput = getTagFromIdentifierAndTitle('div', myPeoplePicker_UpperLevel_ID, 'People Picker');
        var assingedToInput = getTagFromIdentifier(myPeoplePicker_UpperLevel_ID);
        assingedToInput.innerHTML = myPPValue ;
        // refresh and validate picker control
        if(!ValidatePickerControl(myPeoplePicker_ID))
        { ShowValidationError();}
        var arg = getUplevel(myPeoplePicker_ID);
        var ctx = myPeoplePicker_ID;
        EntityEditorSetWaitCursor(ctx);
        WebForm_DoCallback(myPeoplePicker_Name,arg,EntityEditorHandleCheckNameResult,ctx,EntityEditorHandleCheckNameError,true);
    }

    function fillInputField(SPFF_ID, newTF_ID)
    {
        var sptf = document.getElementById(newTF_ID);
        var spff = document.getElementById(SPFF_ID);
        spff.value = sptf.innerHTML;
    }

    function Fill_Lookup_Select_FromFieldName(fieldName, newTF_ID, type)
    {
        var value = document.getElementById(newTF_ID).innerHTML;
        if (value == undefined) return;
        var theSelect = getTagFromIdentifierAndTitle("select", type,fieldName);
        // if theSelect is null, it means that the target list has more than
        // 20 items, and the Lookup is being rendered with an input element
        if (theSelect == null) {
                    var theInput = getTagFromIdentifierAndTitle("input","",fieldName);
                    ShowDropdown(theInput.id); //this function is provided by SharePoint
                    var opt=document.getElementById(theInput.opt);
                    setSelectedOption(opt, value);
                    OptLoseFocus(opt); //this function is provided by SharePoint
       } else {
                    setSelectedOption(theSelect, value);
       }
    }

    function setSelectedOption(select, value) {
        var opts = select.options;
        var l = opts.length;
        if (select == null) return;
        for (var i=0; i < l; i++) {
            if (opts[i].value == value) {
                select.selectedIndex = i;
                return true;
            }
        }
        return false;
    }

    function fillHyperlinkField(SPFFUrl_ID, SPFFDesc_ID, newTF_ID)
    {
        var sptf = document.getElementById(newTF_ID);
        var spffurl = document.getElementById(SPFFUrl_ID);
        var spffdesc = document.getElementById(SPFFDesc_ID);
        var mySplitResult = sptf.innerHTML.split(", ");
        if(mySplitResult.length > 1)
        {
                    spffurl.value = mySplitResult[0];
                    spffdesc.value = mySplitResult[1];
        }
        else
        {
                    spffurl.value = mySplitResult[0];
        }
    }

    function fillCheckboxField(SPFF_ID, newTF_ID)
    {
        var sptf = document.getElementById(newTF_ID);
        var spff = document.getElementById(SPFF_ID);
        if (sptf.innerHTML.toUpperCase()=="TRUE"||sptf.innerHTML=="1"){
   spff.checked=true;
  }
        if (sptf.innerHTML.toUpperCase()=="FALSE"||sptf.innerHTML=="0"){
            spff.checked=false;
        }
    }

    // only change this function...
    function fillAllDefaultValues()
    {
        // Pre-populate Title or other Text Fields
                    fillInputField("[SP_ID_TextField]","RECORD1");
  // Pre-populate peoplepicker field
     fillPeoplePicker("[SP_ID_UserField]","[SP_NAME_UserField]", "RECORD2");

        // Pre-populate Lookup/Select Field
                    Fill_Lookup_Select_FromFieldName("[SP_ID_DropDownChoice]","RECORD3", 'DropDownChoice');
        // Pre-Populate Date Field
                    // ddwrt:FormatDate(string(<<Date Field>>),2057,1) ==> DD/MM/YYYY
                    // ddwrt:FormatDate(string(<<Date Field>>),2057,2) ==> M/DD/YYYY HH:MM AM/PM
                    // ddwrt:FormatDate(string(<<Date Field>>),2057,3) ==> DD Month YYYY
                    // ddwrt:FormatDate(string(<<Date Field>>),2057,4) ==> HH:MM
                    // ddwrt:FormatDate(string(<<Date Field>>),2057,5) ==> DD/MM/YY HH:MM
                    // ddwrt:FormatDate(string(<<Date Field>>),2057,7) ==> DD Month YYYY HH:MM
                    // ddwrt:FormatDate(string(<<Date Field>>),2057,12) ==> HH:MM:SS
                    // ddwrt:FormatDate(string(<<Date Field>>),2057,13) ==> DD/MM/YYYY HH:MM:SS
                    // ddwrt:FormatDate(string(<<Date Field>>),2057,15) ==> DD Month YYYY HH:MM:SS
                    // ddwrt:FormatDate(string(<<Date Field>>),1033,1) ==> M/DD/YYYY
                    // ddwrt:FormatDate(string(<<Date Field>>),1033,2) ==> M/DD/YYYY HH:MM AM/PM
                    // ddwrt:FormatDate(string(<<Date Field>>),1033,3) ==> DAY, Month DD, YYYY
                    // ddwrt:FormatDate(string(<<Date Field>>),1033,4) ==> HH:MM AM/PM
                    // ddwrt:FormatDate(string(<<Date Field>>),1033,7) ==> DAY, Month DD, YYYY HH:MM AM/PM
                    // ddwrt:FormatDate(string(<<Date Field>>),1033,13) ==> M/DD/YYYY HH:MM:SS AM/PM
                    // ddwrt:FormatDate(string(<<Date Field>>),1033,15) ==> DAY, Month DD, YYYY YYYY HH:MM:SS AM/PM
                    // fillInputField( ID of Sharepoint Form Text Field, ID of DIV readonly field)
                    fillInputField("[SP_ID_DateTimeField_DateTimeFieldDate]", "RECORD4");
        // Pre-Populate Hyperlink
                    fillHyperlinkField("[SP_IDUrl_FieldUrl]","[SP_ID_UrlFieldDescription]", "RECORD5");
        // Pre-Populate CheckBox
                    fillCheckboxField("[SP_ID_BooleanField]", "RECORD6");

 }
    </script><p>(c)SPCC</p>]]>
Still missing at this moment...
- fill in Date Time Field
- fill in Multi select Field
- fill in radio button
- ... ????

If you have scripts to do this... don't hesitate to contact me... ;-)
otherwise... I will create them and post them in an update in a few days...
dinsdag 10 januari 2012
How to create a Redirection Page in Sharepoint 2010
In Sharepoint different solutions are possible if you want to create
a redirection page.
1) You can create a .aspx page that you deploy in the layouts folder
and programmaticaly call the response.redirect(url) function in the code behind
of your page in the page_load function. Advantage of this solution is that you can add additional
code to your aspx page for example to encrypt the url parameters.
Disadvantage, you need to deploy your solution on your sharepoint Farm.
In some organisations you have to ask to your administrator
for the deployment what can give some delay and administration.

2) Create a webpart page in Sharepoint and add the Content Editor Web Part
to a zone of your choice. It doesn't really matter since users won't be using the page.
Go to the HTML source of your Content Editor Web part and add next line of code if you want
the user to let them change there bookmarks...
<SCRIPT type='"text/javascript"'>// <![CDATA[
alert("This site has been moved to another location, please update all existing bookmarks.  You will be redirected momentarily.");
// ]]></SCRIPT>
for the redirection you add next line of code behind the script part :
<meta http-equiv="refresh" content="10;url=http://MYSERVERNAME.com/Pages/default.aspx">
Advantage of this solution, no need of administrators for the deployment of your solution.
Disadvantage, you cannot add additional development code to the server side.

 3) Create in Visual Studio 2010 a sandbox solution and add a web part to your project.
 In the webpart you can add additional code for generating the url.
 For example calculate parameters for your redirection.
 But you cannot redirect to your new page from the code begint.
 You need to add programmaticaly some scripting code to your webpart page for the redirection.
 This script can be very easy:
  <script language="text/javascript>
   window.location = yournewurl;
  </script>
After deploying your Sandbox solution you can add your webpart to a webpart page
and the redirection will happen immediately.

Advantage, you can use extra development code in your webpart for calculations.
Also you can easely upload yourself your webpart to your Sharepoint Collection in
the Solutions library, and activate it.
Disadvantage, you need to take care about the limitations of Sandbox solutions.
Abonneren op:
Posts (Atom)